
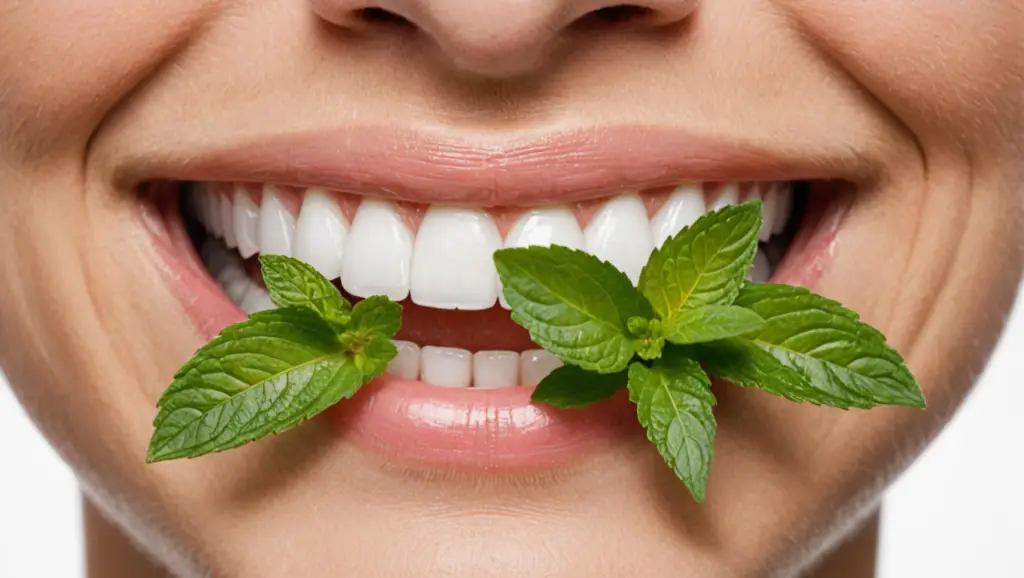
Brighter Smile at Any Age! Discover 12 proven tips to achieve whiter, healthier teeth and boost your confidence today.

Table of Contents

12 Proven Tips for a Brighter Smile at Any Age
Are you tired of hiding your smile in photos or feeling self-conscious about your teeth? 😬 A bright, confident smile can be a game-changer at any age, boosting your self-esteem and leaving a lasting impression on everyone you meet. But achieving that pearly white glow isn’t always easy, especially as we navigate different life stages and face various challenges to our oral health.
Fear not! 🦸♀️ Whether you’re a teenager battling coffee stains, a busy professional looking for quick fixes, or a senior seeking gentle yet effective whitening methods, we’ve got you covered. In this comprehensive guide, we’ll explore 12 proven tips for a brighter smile at any age, covering everything from daily dental care habits to cutting-edge technology and natural remedies.
Get ready to transform your smile and unlock the secret to dazzling teeth that will light up any room. We’ll dive into essential topics like diet and lifestyle changes, professional treatments, and long-term maintenance strategies. So, grab your toothbrush and prepare to embark on a journey to a brighter, more confident you! 🦷✨
Daily Dental Care Habits
Brushing techniques for maximum effectiveness
To achieve a brighter smile, mastering the right brushing technique is crucial. Proper brushing not only removes plaque and food particles but also helps prevent staining and maintains overall oral health. Here are some key techniques to ensure maximum effectiveness:
- The 45-degree angle method: Position your toothbrush at a 45-degree angle to your gums. This angle allows the bristles to reach the gum line and the tooth surface effectively.
- Gentle circular motions: Use gentle, circular motions to clean the outer surfaces of your teeth. This technique helps to dislodge plaque without damaging your enamel or gums.
- Back-and-forth technique for chewing surfaces: For the chewing surfaces of your molars, use a back-and-forth motion to clean the grooves and crevices.
- Clean inner tooth surfaces: Don’t forget the inner surfaces of your teeth. Tilt the brush vertically and use up-and-down strokes to clean these often-neglected areas.
- Two-minute rule: Brush for at least two minutes, dividing your mouth into four quadrants and spending 30 seconds on each.
- Don’t neglect the gum line: Gently brush along the gum line to remove plaque buildup and prevent gingivitis.
- Proper pressure: Apply gentle pressure while brushing. Brushing too hard can wear down enamel and irritate gums.
By incorporating these techniques into your daily routine, you’ll be on your way to a brighter, healthier smile.
Choosing the right toothbrush and toothpaste
Selecting the appropriate toothbrush and toothpaste is essential for maintaining optimal oral hygiene and achieving a brighter smile. Here’s a guide to help you make informed choices:
Toothbrush Selection
When choosing a toothbrush, consider the following factors:
- Bristle type: Soft bristles are generally recommended as they’re gentle on teeth and gums while still effective at removing plaque.
- Head size: Choose a brush head that comfortably fits your mouth and reaches all areas easily.
- Handle grip: Ensure the handle provides a comfortable grip for better control during brushing.
- Manual vs. Electric: Both can be effective when used correctly. Electric toothbrushes may offer additional features like timers and pressure sensors.
Toothpaste Selection
Choosing the right toothpaste can significantly impact your teeth whitening efforts. Consider these factors:
- Fluoride content: Look for toothpaste with fluoride to strengthen enamel and prevent decay.
- Whitening ingredients: Some toothpastes contain mild abrasives or chemical agents that help remove surface stains.
- Sensitivity: If you have sensitive teeth, opt for toothpaste designed for sensitivity relief.
- Specific needs: Consider toothpastes that address particular concerns like gum health or tartar control.
Here’s a comparison table of different toothpaste types:
| Toothpaste Type | Main Benefits | Best For |
|---|---|---|
| Fluoride | Cavity prevention, enamel strengthening | General use |
| Whitening | Stain removal, brightness enhancement | Those seeking whiter teeth |
| Sensitive | Reduces tooth sensitivity | People with sensitive teeth |
| Natural/Herbal | Chemical-free, often fluoride-free | Those preferring natural ingredients |
| Tartar Control | Helps prevent tartar buildup | People prone to tartar formation |
Remember, the effectiveness of your oral care routine depends not just on the products you choose, but also on how consistently and correctly you use them.
Flossing: Why it’s crucial for a brighter smile
While brushing is essential, flossing plays a vital role in maintaining a bright, healthy smile. Many people underestimate the importance of flossing, but it’s a critical step in your daily dental care routine. Here’s why flossing is crucial:
- Removes hidden plaque: Flossing reaches areas between teeth and below the gum line that your toothbrush can’t access, removing plaque that can lead to staining.
- Prevents tartar buildup: Regular flossing prevents plaque from hardening into tartar, which can only be removed by a dental professional.
- Reduces risk of gum disease: By removing plaque near the gum line, flossing helps prevent gingivitis and more severe forms of gum disease.
- Enhances overall tooth appearance: Clean spaces between teeth contribute to a brighter, more uniform smile.
- Freshens breath: Removing food particles stuck between teeth helps eliminate bad breath.
To make the most of your flossing routine:
- Use about 18 inches of floss, winding most around your middle fingers
- Slide the floss gently between teeth using a rubbing motion
- When the floss reaches the gum line, curve it into a C shape against one tooth
- Gently slide it into the space between the gum and the tooth
- Repeat this process for all teeth, using a clean section of floss each time
Incorporating flossing into your daily routine might take some getting used to, but the benefits for your smile are undeniable. For those who find traditional flossing challenging, consider alternatives like water flossers or floss picks.
Importance of tongue cleaning
Often overlooked in dental care routines, tongue cleaning is a crucial step for maintaining a brighter smile and overall oral health. The tongue harbors bacteria and food particles that can contribute to bad breath and tooth discoloration. Here’s why tongue cleaning should be an integral part of your daily dental care:
- Removes bacteria: The tongue’s surface is covered in tiny papillae that can trap bacteria. Cleaning removes these bacteria, reducing the risk of tooth decay and gum disease.
- Improves breath: Many cases of bad breath (halitosis) are caused by bacteria on the tongue. Regular cleaning can significantly improve breath freshness.
- Enhances taste: A clean tongue allows your taste buds to function more effectively, enhancing your ability to enjoy flavors.
- Reduces tooth staining: Bacteria on the tongue can transfer to teeth, contributing to staining. Regular tongue cleaning helps maintain a brighter smile.
- Promotes overall oral health: A clean tongue contributes to a healthier oral environment, supporting the health of your teeth and gums.
Methods for tongue cleaning:
- Tongue scrapers: These specially designed tools effectively remove the coating on your tongue.
- Toothbrush: You can use your toothbrush to gently brush your tongue from back to front.
- Mouthwash: While not a substitute for mechanical cleaning, mouthwash can help kill bacteria on the tongue.
To incorporate tongue cleaning into your routine:
- Clean your tongue once or twice daily, preferably after brushing your teeth
- Start at the back of the tongue and work your way forward
- Use gentle pressure to avoid irritating the tongue
- Rinse your mouth thoroughly after cleaning
By adding tongue cleaning to your daily dental care habits, you’re taking a comprehensive approach to oral hygiene that will contribute significantly to a brighter, healthier smile.
Now that we’ve covered the essential daily dental care habits for a brighter smile, let’s explore how diet and lifestyle changes can further enhance your dental health and appearance.

Diet and Lifestyle Changes
Foods that naturally whiten teeth
When it comes to achieving a brighter smile, your diet plays a crucial role. Certain foods can naturally help whiten your teeth, acting as nature’s own tooth-whitening agents. Let’s explore some of these beneficial foods:
- Crunchy fruits and vegetables:
- Apples
- Carrots
- Celery
- Cauliflower
These foods act as natural toothbrushes, scrubbing away surface stains as you chew. They also stimulate saliva production, which helps neutralize acids and wash away food particles.
- Strawberries:
Rich in malic acid, strawberries can help remove surface stains on teeth. Try mashing a strawberry and mixing it with baking soda for a natural tooth-whitening paste. - Pineapple:
Contains bromelain, an enzyme that has natural cleansing and stain-removing properties. - Dairy products:
- Milk
- Yogurt
- Cheese
These foods are high in calcium and phosphates, which help strengthen tooth enamel and can make teeth appear whiter.
- Nuts and seeds:
- Almonds
- Walnuts
- Sunflower seeds
Their abrasive texture can help scrub away stains, and they’re also rich in nutrients that promote oral health.
Here’s a quick reference table of foods that can help whiten your teeth:
| Food Category | Examples | Benefits |
|---|---|---|
| Crunchy fruits and vegetables | Apples, carrots, celery | Natural scrubbing action, increased saliva production |
| Berries | Strawberries | Contains malic acid for stain removal |
| Tropical fruits | Pineapple | Bromelain enzyme for cleansing |
| Dairy products | Milk, yogurt, cheese | Strengthen enamel, promote whiteness |
| Nuts and seeds | Almonds, walnuts, sunflower seeds | Abrasive texture for stain removal, nutrient-rich |
Incorporating these foods into your diet can contribute to a brighter smile while also providing essential nutrients for overall health.
Beverages to avoid for maintaining tooth color
While some foods can help whiten your teeth, certain beverages can have the opposite effect. To maintain your bright smile, it’s crucial to be mindful of what you drink. Here are some beverages to limit or avoid:
- Coffee and tea:
Both are notorious for staining teeth due to their high tannin content. If you can’t give them up completely, try drinking through a straw to minimize contact with your teeth. - Red wine:
Contains chromogens and tannins that can lead to discoloration. White wine, while less staining, is still acidic and can erode enamel. - Soft drinks and energy drinks:
High in sugar and acids, these beverages can erode enamel and make teeth more susceptible to staining. - Dark juices:
Grape, cranberry, and other dark fruit juices can stain teeth. Opt for lighter-colored juices or dilute them with water. - Sports drinks:
Often high in sugar and acids, these can contribute to enamel erosion and staining.
Instead, focus on these tooth-friendly beverages:
- Water: The best choice for hydration and oral health
- Milk: Rich in calcium and phosphates for stronger teeth
- Green tea: Contains polyphenols that can help reduce bacteria in the mouth
Here’s a comparison table of beverages to avoid and their alternatives:
| Beverages to Avoid | Why | Tooth-Friendly Alternatives |
|---|---|---|
| Coffee and tea | High tannin content, staining | Green tea, herbal tea |
| Red wine | Chromogens and tannins, discoloration | White wine (in moderation) |
| Soft drinks | Sugar and acids, enamel erosion | Water, sparkling water |
| Dark juices | Staining potential | Light-colored juices, diluted juices |
| Sports drinks | Sugar and acids, enamel erosion | Water, coconut water |
By making smart beverage choices, you can protect your teeth from staining and maintain your bright smile.
Quitting smoking for improved oral health
Smoking is not only detrimental to your overall health but also has a significant negative impact on your oral health and the appearance of your teeth. Quitting smoking is one of the most effective lifestyle changes you can make for a brighter smile. Here’s why:
- Stain removal:
Tobacco causes stubborn yellow and brown stains on teeth. Quitting smoking allows your natural tooth color to shine through and makes professional whitening treatments more effective. - Reduced risk of gum disease:
Smoking weakens your immune system, making it harder to fight off gum infections. Quitting can help prevent and even reverse early stages of gum disease. - Better breath:
Smoking causes chronic bad breath. Eliminating tobacco use can significantly improve your breath and overall oral freshness. - Improved taste and smell:
Smoking dulls your senses of taste and smell. Quitting can help restore these senses, allowing you to enjoy food and beverages more fully. - Decreased risk of oral cancer:
Smoking is a leading cause of oral cancer. Quitting dramatically reduces your risk of developing this serious condition. - Faster healing:
Smoking impairs the body’s healing process. Quitting can help your mouth heal faster after dental procedures or injuries. - Cost savings:
The money saved from not buying tobacco products can be invested in professional dental care or whitening treatments.
If you’re struggling to quit, consider these strategies:
- Nicotine replacement therapy
- Counseling or support groups
- Gradual reduction
- Exercise and stress management techniques
- Identifying and avoiding triggers
Remember, quitting smoking is a journey, and it’s never too late to start. The benefits to your oral health and overall well-being are immense and begin almost immediately after your last cigarette.
Staying hydrated for a healthier mouth
Proper hydration is often overlooked when it comes to oral health, but it plays a crucial role in maintaining a bright, healthy smile. Here’s why staying hydrated is essential for your mouth:
- Saliva production:
Water is the primary component of saliva, which is vital for:- Neutralizing acids in the mouth
- Washing away food particles
- Preventing dry mouth
- Fighting bacteria growth
- Natural cleansing:
Drinking water throughout the day helps rinse away food debris and bacteria that can cause staining and decay. - Preventing bad breath:
A well-hydrated mouth is less likely to develop bad breath, as bacteria thrive in dry environments. - Strengthening teeth:
If your local water is fluoridated, drinking tap water can help strengthen your tooth enamel. - Reducing tooth sensitivity:
Proper hydration helps maintain the protective layer of saliva on your teeth, reducing sensitivity to hot and cold.
Tips for staying hydrated for better oral health:
- Aim for at least 8 glasses of water a day
- Keep a reusable water bottle with you
- Set reminders on your phone to drink water regularly
- Eat water-rich foods like cucumbers, watermelon, and celery
- Limit alcohol and caffeine consumption, as they can be dehydrating
Here’s a breakdown of the benefits of proper hydration for oral health:
| Benefit | How It Helps |
|---|---|
| Increased saliva production | Neutralizes acids, washes away debris, fights bacteria |
| Natural cleansing | Rinses mouth throughout the day |
| Fresh breath | Prevents dry mouth and bacteria growth |
| Stronger teeth | Fluoride exposure (if water is fluoridated) |
| Reduced sensitivity | Maintains protective saliva layer |
By making these diet and lifestyle changes – incorporating teeth-whitening foods, avoiding staining beverages, quitting smoking, and staying hydrated – you can significantly improve your oral health and achieve a brighter smile. These habits complement your daily oral care routine and professional dental treatments, working together to give you the confident, radiant smile you desire. Remember, consistency is key in maintaining these changes, and the benefits extend far beyond just a whiter smile – you’ll be promoting better overall health as well.
Professional Dental Treatments
Regular dental cleanings and check-ups
Regular dental cleanings and check-ups are the cornerstone of maintaining a bright, healthy smile. These routine visits to your dentist play a crucial role in preventing stains, removing existing discoloration, and addressing potential oral health issues before they worsen.
During a professional cleaning, your dental hygienist will:
- Remove plaque and tartar buildup
- Polish your teeth to remove surface stains
- Floss between your teeth
- Apply fluoride treatment (if necessary)
Here’s a breakdown of the benefits of regular dental cleanings:
| Benefit | Description |
|---|---|
| Stain Prevention | Removes substances that can lead to discoloration |
| Oral Health | Reduces the risk of gum disease and cavities |
| Early Detection | Identifies potential issues before they become serious |
| Professional Assessment | Provides expert advice on your oral care routine |
| Confidence Boost | Leaves you with a cleaner, brighter smile |
It’s recommended to schedule dental cleanings every six months for optimal oral health and a brighter smile. However, some individuals may need more frequent visits based on their specific oral health needs.
Professional whitening options
When it comes to achieving a noticeably brighter smile, professional whitening treatments offer some of the most effective and fastest results. These treatments are performed under the supervision of a dental professional, ensuring safety and efficacy.
There are several professional whitening options available:
- In-office whitening
- Take-home whitening trays
- Combination treatments
Let’s explore each of these options in more detail:
In-office whitening
In-office whitening is the quickest way to dramatically whiten your teeth. This procedure typically takes about an hour and can lighten your teeth by several shades in a single visit.
The process involves:
- Protecting your gums with a special barrier
- Applying a high-concentration whitening gel to your teeth
- Activating the gel with a special light or laser
- Repeating the process multiple times during the session
The main advantages of in-office whitening are:
- Immediate results
- Professional supervision
- Customized treatment
- Reduced sensitivity due to proper gum protection
Take-home whitening trays
Take-home whitening trays offer a more gradual approach to teeth whitening. Your dentist will create custom-fitted trays that you’ll use with a professional-grade whitening gel at home.
The process typically involves:
- Taking impressions of your teeth
- Creating custom-fitted trays
- Providing you with whitening gel and instructions
- Using the trays daily for a specified period (usually 1-2 weeks)
Benefits of take-home whitening trays include:
- Convenience of whitening at home
- Gradual whitening for reduced sensitivity
- Ability to touch up results as needed
- Cost-effective compared to repeated in-office treatments
Combination treatments
Some dentists offer combination treatments that start with an in-office whitening session followed by take-home trays for maintenance. This approach provides the best of both worlds:
- Immediate results from the in-office treatment
- Long-term maintenance with take-home trays
When considering professional whitening options, it’s essential to consult with your dentist to determine the best approach for your specific needs and goals.
Veneers and bonding for severe discoloration
In cases of severe discoloration or when whitening treatments aren’t sufficient, veneers and bonding offer excellent solutions for achieving a brighter smile.
Veneers
Veneers are thin, custom-made shells of tooth-colored materials designed to cover the front surface of teeth. They can dramatically improve the appearance of severely discolored teeth.
Types of veneers:
- Porcelain veneers
- Composite resin veneers
The process of getting veneers typically involves:
- Consultation and planning
- Preparation of the teeth (minimal enamel removal)
- Custom fabrication of the veneers
- Bonding the veneers to the teeth
Benefits of veneers:
- Long-lasting results (10-15 years for porcelain veneers)
- Natural-looking appearance
- Resistance to staining
- Ability to correct multiple cosmetic issues simultaneously
Bonding
Dental bonding is a procedure where a tooth-colored resin material is applied and hardened with a special light, bonding the material to the tooth to improve its appearance.
The bonding process typically includes:
- Selecting the resin color to match your teeth
- Preparing the tooth surface
- Applying and shaping the bonding material
- Hardening the material with a UV light
- Final shaping and polishing
Advantages of bonding:
- Less expensive than veneers
- Can be completed in a single office visit
- Minimal tooth preparation required
- Effective for small cosmetic changes and repairs
When deciding between veneers and bonding, consider the following factors:
| Factor | Veneers | Bonding |
|---|---|---|
| Durability | 10-15 years | 3-7 years |
| Cost | Higher | Lower |
| Procedure Time | Multiple visits | Single visit |
| Stain Resistance | Excellent | Good |
| Customization | Highly customizable | Limited customization |
Your dentist can help you determine which option is best suited for your specific case, taking into account factors such as the extent of discoloration, your budget, and long-term goals for your smile.
Professional dental treatments offer powerful solutions for achieving and maintaining a brighter smile. From regular cleanings to advanced cosmetic procedures, these treatments can address a wide range of dental concerns and help you achieve the confident, radiant smile you desire. As we move forward, we’ll explore how natural remedies can complement these professional treatments in your quest for a brighter smile.
Natural Remedies for Teeth Whitening
Oil pulling benefits
Oil pulling is an ancient Ayurvedic practice that has gained popularity in recent years as a natural method for teeth whitening and overall oral health improvement. This technique involves swishing oil in your mouth for several minutes, typically using coconut, sesame, or sunflower oil.
The benefits of oil pulling for teeth whitening and oral health include:
- Stain removal: Oil pulling can help remove surface stains on teeth, gradually leading to a brighter smile.
- Plaque reduction: The swishing action helps dislodge and remove plaque buildup on teeth.
- Bacteria elimination: Certain oils, like coconut oil, have antimicrobial properties that can reduce harmful bacteria in the mouth.
- Fresh breath: By removing bacteria and food particles, oil pulling can help combat bad breath.
- Gum health: The practice may help reduce inflammation and improve overall gum health.
To incorporate oil pulling into your routine:
- Choose a high-quality, organic oil (coconut oil is a popular choice)
- Take 1-2 tablespoons of oil in your mouth
- Swish the oil around for 15-20 minutes
- Spit the oil out (avoid swallowing)
- Rinse your mouth thoroughly with warm water
- Brush your teeth as usual
For best results, practice oil pulling daily, preferably in the morning before eating or drinking anything.
| Oil Type | Benefits | Taste |
|---|---|---|
| Coconut Oil | Antimicrobial, pleasant taste | Mild, slightly sweet |
| Sesame Oil | Rich in antioxidants, traditional choice | Nutty, slightly bitter |
| Sunflower Oil | High in Vitamin E, affordable | Neutral, light |
While oil pulling can be an effective natural remedy for teeth whitening, it’s important to note that results may vary and can take time to become noticeable. Consistency is key when incorporating this practice into your oral care routine.
Baking soda and hydrogen peroxide mixtures
Baking soda and hydrogen peroxide are two common household items that, when combined, can create an effective natural teeth whitening solution. This mixture works by gently removing surface stains and killing bacteria that contribute to discoloration.
Here’s how to create and use a baking soda and hydrogen peroxide mixture for teeth whitening:
- Mix 2 tablespoons of hydrogen peroxide with 1 tablespoon of baking soda
- Stir until you form a paste-like consistency
- Apply the mixture to your toothbrush
- Brush your teeth gently for 2 minutes
- Rinse thoroughly with water
- Use this mixture no more than twice a week to avoid enamel damage
Benefits of using baking soda and hydrogen peroxide for teeth whitening:
- Gentle abrasion: Baking soda acts as a mild abrasive, helping to remove surface stains without damaging enamel
- Oxygenating effect: Hydrogen peroxide releases oxygen molecules, which help break down stains and kill bacteria
- Cost-effective: These ingredients are inexpensive and readily available
- Customizable: You can adjust the ratio of ingredients to suit your preferences and sensitivity
It’s important to note that while this mixture can be effective, it should be used in moderation. Overuse can lead to enamel erosion and increased tooth sensitivity. Always consult with your dentist before starting any new teeth whitening regimen, especially if you have sensitive teeth or existing dental issues.
For those with sensitive teeth, consider these alternatives:
- Use a lower concentration of hydrogen peroxide (1-1.5% instead of 3%)
- Reduce the frequency of use to once a week
- Mix baking soda with water instead of hydrogen peroxide for a gentler option
Remember to maintain good oral hygiene practices alongside any natural whitening treatments. Brush twice daily, floss regularly, and visit your dentist for professional cleanings and check-ups.
Fruit peels as natural whiteners
Fruit peels have gained attention as a natural alternative for teeth whitening. While not as potent as chemical treatments, certain fruit peels contain enzymes and acids that may help remove surface stains and brighten teeth over time. Here are some popular fruit peels used for natural teeth whitening:
- Banana peel
- Orange peel
- Lemon peel
- Strawberry
Let’s explore each of these options in more detail:
- Banana peel:
- Rich in potassium, magnesium, and manganese
- Gently rub the inside of a banana peel on your teeth for about 2 minutes
- Repeat daily for best results
- May help reduce yellowing and strengthen tooth enamel
- Orange peel:
- Contains citric acid and vitamin C
- Rub the white side of the peel on your teeth for 2-3 minutes
- Rinse thoroughly afterward
- Use 2-3 times a week
- Lemon peel:
- High in citric acid, which can help remove stains
- Gently rub the inside of the peel on your teeth for 1-2 minutes
- Rinse well and brush with regular toothpaste afterward
- Use cautiously and infrequently due to high acidity
- Strawberry:
- Contains malic acid, which may help whiten teeth
- Mash a ripe strawberry and mix with a pinch of baking soda
- Apply the mixture to your teeth and leave for 5 minutes
- Rinse thoroughly and brush with regular toothpaste
- Use once a week
While fruit peels can be a natural and cost-effective way to brighten your smile, it’s important to understand their limitations and potential risks:
- Results may be subtle and take time to become noticeable
- Acidic fruits (like lemon and orange) can erode tooth enamel if used excessively
- People with sensitive teeth or existing dental issues should consult a dentist before trying these methods
To maximize the benefits of fruit peel whitening while minimizing risks, consider the following tips:
- Always rinse your mouth thoroughly after using fruit peels
- Wait at least 30 minutes before brushing your teeth to allow enamel to remineralize
- Use fruit peel treatments in moderation, no more than 2-3 times a week
- Combine fruit peel treatments with other natural whitening methods for better results
| Fruit Peel | Main Active Component | Frequency of Use | Precautions |
|---|---|---|---|
| Banana | Potassium, Magnesium | Daily | Minimal risk |
| Orange | Citric Acid, Vitamin C | 2-3 times/week | Watch for enamel erosion |
| Lemon | Citric Acid | 1-2 times/week | High acidity, use cautiously |
| Strawberry | Malic Acid | Once a week | Combine with baking soda |
It’s worth noting that while these natural remedies can contribute to a brighter smile, they may not be as effective as professional teeth whitening treatments or over-the-counter whitening products. For significant discoloration or stubborn stains, it’s best to consult with a dentist to explore more potent whitening options.
In conclusion, natural remedies like oil pulling, baking soda and hydrogen peroxide mixtures, and fruit peels can be valuable additions to your oral care routine for maintaining a brighter smile. However, it’s crucial to use these methods in moderation and in conjunction with regular dental check-ups and good oral hygiene practices. By combining these natural approaches with professional care and a healthy lifestyle, you can work towards achieving and maintaining a beautiful, white smile at any age.
Maintaining White Teeth at Different Life Stages
Teeth care for teenagers and young adults
As teenagers and young adults embark on their journey to adulthood, maintaining a bright smile becomes increasingly important. This age group faces unique challenges when it comes to oral health, including increased independence, changing dietary habits, and social pressures.
To ensure a dazzling smile during these formative years, consider the following tips:
- Establish a consistent oral hygiene routine:
- Brush twice daily with fluoride toothpaste
- Floss at least once a day
- Use an alcohol-free mouthwash to combat bacteria
- Be mindful of dietary choices:
- Limit sugary and acidic foods and beverages
- Rinse mouth with water after consuming staining foods or drinks
- Incorporate calcium-rich foods for stronger teeth
- Address orthodontic needs:
- Consult with an orthodontist for proper teeth alignment
- Follow care instructions for braces or clear aligners
- Protect teeth during sports:
- Wear a mouthguard during contact sports
- Avoid chewing on hard objects like ice or pen caps
Here’s a comparison of common teeth-staining culprits among teenagers and young adults:
| Staining Agent | Staining Potential | Prevention Tips |
|---|---|---|
| Coffee/Tea | High | Use a straw, rinse mouth after consumption |
| Soda | High | Limit intake, opt for clear sodas |
| Energy Drinks | Medium | Reduce consumption, rinse mouth thoroughly |
| Berries | Medium | Brush teeth after eating |
| Tomato-based sauces | Low to Medium | Rinse mouth or brush teeth after meals |
Addressing age-related yellowing
As we age, our teeth naturally begin to lose their bright white appearance. This is due to a combination of factors, including the thinning of enamel, accumulation of stains, and changes in dentin color. However, there are several strategies to combat age-related yellowing and maintain a youthful smile:
- Professional whitening treatments:
- In-office bleaching for faster results
- Take-home whitening trays for gradual improvement
- Regular dental check-ups:
- Schedule bi-annual cleanings to remove surface stains
- Address any underlying dental issues promptly
- Use whitening toothpaste:
- Look for ADA-approved whitening toothpaste
- Consider toothpaste with natural whitening agents like baking soda
- Maintain good oral hygiene:
- Brush at least twice daily with a soft-bristled brush
- Floss daily to remove plaque between teeth
- Use an electric toothbrush for more effective cleaning
- Consider cosmetic treatments:
- Dental veneers for severely stained or damaged teeth
- Bonding for minor imperfections and discoloration
Remember that consistency is key when addressing age-related yellowing. Implement these strategies as part of your daily routine for the best results.
Dental care during pregnancy
Pregnancy brings about numerous changes in a woman’s body, including those affecting oral health. Hormonal fluctuations can increase the risk of gum disease and tooth decay, making proper dental care crucial during this time. Here are some essential tips for maintaining white teeth and overall oral health during pregnancy:
- Schedule a dental check-up:
- Inform your dentist about your pregnancy
- Discuss any concerns or symptoms you may be experiencing
- Practice diligent oral hygiene:
- Brush gently but thoroughly twice a day
- Use a soft-bristled toothbrush to avoid irritating sensitive gums
- Floss daily to remove plaque and food particles
- Manage morning sickness:
- Rinse mouth with water or a fluoride mouthwash after vomiting
- Wait at least 30 minutes before brushing to protect enamel
- Address pregnancy gingivitis:
- Be vigilant for signs of gum inflammation
- Use an antimicrobial mouthwash to reduce bacteria
- Maintain a balanced diet:
- Consume calcium-rich foods for strong teeth and bones
- Limit sugary snacks and drinks
- Stay hydrated to prevent dry mouth
It’s important to note that some dental treatments may need to be postponed until after pregnancy. However, essential treatments can usually be performed safely during the second trimester. Always consult with your dentist and obstetrician before undergoing any dental procedures while pregnant.
Oral health in senior years
As we enter our golden years, maintaining a bright smile becomes increasingly challenging but no less important. Seniors face unique oral health issues that can affect the appearance and health of their teeth. Here are some strategies to keep your smile radiant in your senior years:
- Address dry mouth:
- Stay hydrated by drinking plenty of water
- Use saliva substitutes or sugar-free gum to stimulate saliva production
- Avoid alcohol-based mouthwashes that can further dry out the mouth
- Manage medications:
- Discuss potential oral side effects with your doctor
- Consider alternative medications if dry mouth is severe
- Adapt oral hygiene routine:
- Use an electric toothbrush for easier handling
- Consider floss picks or water flossers for easier interdental cleaning
- Use toothpaste designed for sensitive teeth if needed
- Regular dental visits:
- Schedule check-ups every six months or as recommended by your dentist
- Address any issues promptly to prevent further complications
- Proper denture care:
- Clean dentures daily with a soft brush and denture cleaner
- Remove dentures at night to allow gums to rest
- Have dentures checked and adjusted regularly for proper fit
- Focus on gum health:
- Be vigilant for signs of gum disease
- Use an antiseptic mouthwash to reduce bacteria
- Consider gum stimulation techniques to improve circulation
Here’s a comparison of common oral health issues in seniors and their solutions:
| Oral Health Issue | Cause | Solution |
|---|---|---|
| Dry mouth | Medications, medical conditions | Stay hydrated, use saliva substitutes |
| Gum recession | Age, brushing too hard | Gentle brushing, regular dental check-ups |
| Tooth sensitivity | Enamel wear, gum recession | Use sensitive toothpaste, fluoride treatments |
| Darkening teeth | Enamel thinning, stain accumulation | Professional whitening, veneers |
| Difficulty cleaning | Arthritis, limited mobility | Electric toothbrush, adapted flossing tools |
Now that we’ve explored maintaining white teeth across different life stages, it’s essential to understand the various technology and tools available for achieving and maintaining a brighter smile. These advancements can complement the age-specific strategies we’ve discussed, providing additional support for your oral health journey.
Technology and Tools for Brighter Smiles
Electric toothbrushes vs. manual brushes
When it comes to achieving a brighter smile, the choice between electric toothbrushes and manual brushes can make a significant difference. Both types of brushes have their merits, but electric toothbrushes often offer superior cleaning power and efficiency.
Electric toothbrushes typically feature:
- Rotating or oscillating bristles
- Timed brushing cycles
- Pressure sensors
- Multiple cleaning modes
Manual brushes, on the other hand, rely entirely on the user’s technique and effort. Let’s compare these two options:
| Feature | Electric Toothbrush | Manual Toothbrush |
|---|---|---|
| Cleaning Efficiency | Higher due to consistent motion | Depends on user technique |
| Plaque Removal | More effective | Less effective |
| Ease of Use | Easier, especially for those with limited mobility | Requires more manual dexterity |
| Cost | Higher initial investment, replacement heads needed | Lower cost, entire brush replaced regularly |
| Battery Life | Needs regular charging | No battery required |
| Travel-friendly | Bulkier, needs charger | Compact and convenient |
Studies have shown that electric toothbrushes can remove up to 21% more plaque than manual brushes over a three-month period. This increased efficiency in plaque removal can lead to whiter teeth and a brighter smile. Additionally, many electric toothbrushes come with built-in timers, ensuring users brush for the dentist-recommended two minutes.
However, it’s important to note that proper technique is crucial regardless of the type of brush used. Even with a manual toothbrush, maintaining good oral hygiene habits can result in a brighter smile.
Water flossers and interdental cleaners
While brushing is essential for maintaining a bright smile, it’s not enough on its own. Interdental cleaning is crucial for removing plaque and food particles that brushing alone can’t reach. This is where water flossers and interdental cleaners come into play.
Water flossers, also known as oral irrigators, use a stream of pulsating water to clean between teeth and along the gumline. They offer several advantages:
- Easier to use than traditional floss
- More effective at removing plaque between teeth
- Gentle on sensitive gums
- Can reach difficult areas, such as around braces or dental implants
Interdental cleaners, such as interdental brushes and floss picks, provide alternative methods for cleaning between teeth. These tools are particularly useful for people with larger gaps between their teeth or those who find traditional flossing challenging.
A comparison of interdental cleaning methods:
| Method | Effectiveness | Ease of Use | Best For |
|---|---|---|---|
| Water Flosser | High | Easy | All users, especially those with braces or implants |
| Interdental Brush | High | Moderate | People with larger gaps between teeth |
| Floss Picks | Moderate | Easy | On-the-go flossing |
| Traditional Floss | High | Requires technique | Thorough cleaning, cost-effective |
Incorporating these tools into your daily oral care routine can significantly contribute to maintaining a brighter smile by ensuring comprehensive plaque removal and preventing stain buildup between teeth.
At-home LED whitening kits
As technology advances, at-home teeth whitening solutions have become increasingly sophisticated. LED whitening kits have gained popularity as an effective and convenient option for achieving a brighter smile from the comfort of your own home.
These kits typically include:
- A whitening gel (usually containing hydrogen peroxide or carbamide peroxide)
- An LED light
- A mouth tray or applicator
The process involves applying the whitening gel to your teeth and then exposing them to the LED light for a specified period. The light is believed to activate or accelerate the whitening process, potentially leading to faster and more noticeable results.
Benefits of at-home LED whitening kits:
- Convenience: Can be used at home on your own schedule
- Cost-effective: Generally less expensive than professional treatments
- Customizable: Many kits offer different treatment intensities
- Quick results: Some users report visible improvements after just a few sessions
However, it’s important to note that while these kits can be effective, they may not produce results as dramatic as professional treatments. Additionally, users should follow instructions carefully to avoid potential side effects such as tooth sensitivity or gum irritation.
When choosing an at-home LED whitening kit, consider factors such as:
- The concentration of the whitening agent
- The number of LED lights in the device
- Treatment duration and frequency
- User reviews and professional recommendations
Whitening strips and trays
Whitening strips and trays are popular over-the-counter options for those seeking a brighter smile. These products offer a balance between effectiveness and convenience, making them a go-to choice for many individuals.
Whitening strips are thin, flexible plastic strips coated with a whitening gel. They are applied directly to the teeth and left on for a specified time, usually 30 minutes to an hour. The advantages of whitening strips include:
- Easy to use
- Relatively inexpensive
- Convenient for on-the-go use
- Available in various strengths
Whitening trays, on the other hand, are custom-fit or one-size-fits-all trays filled with whitening gel. They are placed over the teeth for a specified period, typically longer than strips. The benefits of whitening trays include:
- More thorough coverage of teeth
- Can be more comfortable for some users
- Often come with higher concentrations of whitening agents
Here’s a comparison of whitening strips and trays:
| Feature | Whitening Strips | Whitening Trays |
|---|---|---|
| Application | Easy, directly on teeth | Requires filling tray with gel |
| Coverage | May miss some areas | More comprehensive coverage |
| Treatment Time | Usually shorter sessions | Often longer wear times |
| Customization | Limited | Custom trays available for better fit |
| Convenience | Very portable | Less portable, but reusable |
Both options can be effective in achieving a brighter smile, but results may vary depending on the individual and the specific product used. It’s essential to follow the instructions carefully and not exceed the recommended usage to avoid potential side effects like tooth sensitivity.
As we explore these various technologies and tools for achieving a brighter smile, it’s clear that there are numerous options available to suit different preferences and needs. From advanced electric toothbrushes to convenient at-home whitening solutions, these innovations have made it easier than ever to maintain a radiant smile. However, it’s important to remember that while these tools can be highly effective, they should be used in conjunction with good oral hygiene practices and regular dental check-ups for the best results. With this foundation of knowledge about the latest teeth whitening technologies, we can now turn our attention to addressing common teeth staining culprits and how to combat them effectively.
Addressing Common Teeth Staining Culprits
Coffee and tea stains
Coffee and tea are among the most common culprits when it comes to teeth staining. These popular beverages contain tannins, which are organic compounds that can adhere to tooth enamel and cause discoloration over time. While giving up your daily cup of joe or afternoon tea might seem like the obvious solution, there are ways to enjoy these drinks while minimizing their impact on your smile.
To reduce coffee and tea stains:
- Use a straw: This simple trick helps minimize contact between the liquid and your teeth.
- Rinse your mouth: Swish with water immediately after drinking to wash away staining agents.
- Brush your teeth: Wait 30 minutes after consumption, then brush to remove residual stains.
- Choose lighter options: Opt for white tea or green tea instead of black tea, and consider switching to blonde roast coffee.
| Beverage | Staining Potential | Alternative |
|---|---|---|
| Black Coffee | High | Blonde roast coffee |
| Black Tea | High | White or green tea |
| Herbal Tea | Low | N/A |
| Espresso | Medium | Americano with extra water |
Wine and dark juices
Like coffee and tea, red wine and dark-colored juices can leave stubborn stains on your teeth. These beverages are rich in chromogens, pigmented compounds that cling to tooth enamel. Additionally, the acidity in wine and many juices can temporarily soften enamel, making it more susceptible to staining.
Tips for enjoying wine and juices without compromising your smile:
- Pair with cheese: Eating cheese while drinking wine can help neutralize acids and create a protective film on teeth.
- Alternate with water: Take sips of water between glasses of wine or juice to rinse your mouth.
- Use a straw for juices: This technique helps bypass your front teeth, reducing staining.
- Opt for lighter options: Choose white wine over red, or dilute dark juices with water.
Remember, moderation is key. Limiting your intake of these beverages can significantly reduce their staining effects on your teeth.
Medication-induced discoloration
While less common than food and drink-related stains, medication-induced tooth discoloration can be more challenging to address. Certain medications can affect tooth color either during tooth development or after the teeth have fully formed.
Common medications that may cause tooth discoloration:
- Tetracycline antibiotics
- Antihistamines
- Antipsychotic drugs
- Some blood pressure medications
If you suspect that your medication is causing tooth discoloration, it’s crucial to consult with your healthcare provider before making any changes to your treatment plan. In many cases, the benefits of the medication outweigh the cosmetic concerns.
For those dealing with medication-induced tooth discoloration:
- Discuss alternatives: Ask your doctor if there are alternative medications that don’t cause discoloration.
- Professional whitening: Consult a dentist about professional whitening treatments that may be effective for your specific case.
- Cosmetic dentistry: In severe cases, veneers or bonding may be recommended to cover the discoloration.
Tobacco use effects
Tobacco use, whether through smoking or chewing, is one of the most significant contributors to tooth discoloration. The tar and nicotine in tobacco products can quickly turn your pearly whites into a dull yellow or brown shade. Moreover, tobacco use not only stains teeth but also increases the risk of gum disease, tooth loss, and oral cancer.
Effects of tobacco on dental health:
- Yellow or brown stains on teeth
- Increased plaque and tartar buildup
- Reduced saliva production, leading to dry mouth
- Higher risk of gum disease and tooth loss
- Slower healing after dental procedures
Quitting tobacco is the most effective way to prevent further staining and improve overall oral health. However, if you’re not ready to quit, consider these steps to minimize tobacco-related stains:
- Use tobacco-cessation aids: Nicotine gum or patches can help reduce cravings without staining teeth.
- Maintain rigorous oral hygiene: Brush immediately after using tobacco products.
- Regular dental cleanings: Schedule more frequent professional cleanings to remove tobacco stains.
- Try whitening products: Use tobacco-specific whitening toothpaste or mouthwash.
| Tobacco Product | Staining Potential | Health Risks |
|---|---|---|
| Cigarettes | High | Very High |
| Cigars | High | Very High |
| Chewing Tobacco | Very High | Extremely High |
| E-cigarettes | Low to Medium | Medium |
Now that we’ve covered the common culprits behind teeth staining, it’s important to understand that prevention is key. By being aware of these staining agents and taking proactive steps to minimize their effects, you can maintain a brighter smile for longer. In the next section, we’ll explore preventive measures that can help you achieve long-lasting results in your quest for a brighter smile.
Preventive Measures for Long-lasting Results
Protective sealants for teeth
Protective sealants are a game-changer in maintaining a brighter smile and preventing stains from settling on your teeth. These thin, plastic coatings are applied to the chewing surfaces of your back teeth (molars and premolars) to create a barrier against plaque, bacteria, and staining agents.
Here’s why protective sealants are an essential part of your preventive dental care routine:
- Long-lasting protection: Sealants can last up to 10 years with proper care
- Easy application: The process is quick, painless, and non-invasive
- Cost-effective: Sealants are more affordable than treating decay or stains later
- Suitable for all ages: Both children and adults can benefit from sealants
Let’s take a closer look at the benefits of protective sealants:
| Benefit | Description |
|---|---|
| Stain prevention | Creates a smooth surface that’s less likely to trap staining agents |
| Decay protection | Seals off deep grooves where bacteria can hide and cause decay |
| Enhanced cleaning | Makes it easier to brush and floss effectively |
| Preserves natural tooth structure | Reduces the need for future dental work |
To get the most out of your protective sealants, follow these tips:
- Schedule regular dental check-ups to ensure the sealants are intact
- Continue with your regular oral hygiene routine
- Avoid chewing on hard objects that could damage the sealants
- Consider reapplication if recommended by your dentist
By incorporating protective sealants into your dental care regimen, you’re taking a proactive step towards maintaining a brighter smile for years to come.
Using straws for staining beverages
One of the simplest yet most effective preventive measures for maintaining a brighter smile is using straws when consuming staining beverages. This small change in your drinking habits can significantly reduce the contact between tooth-staining liquids and your teeth, helping to preserve your pearly whites.
Here are some key reasons why using straws is beneficial:
- Minimizes contact: Directs liquids past your front teeth, reducing exposure to staining agents
- Protects enamel: Lessens the impact of acidic beverages on your tooth enamel
- Versatile solution: Can be used with various staining drinks like coffee, tea, and red wine
- Eco-friendly options: Reusable straws are available for environmentally conscious individuals
To maximize the benefits of using straws, consider the following tips:
- Position the straw towards the back of your mouth
- Opt for reusable straws made of materials like stainless steel or glass
- Keep straws handy at home, work, and in your bag for on-the-go use
- Use straws even with cold staining beverages like iced coffee or tea
Let’s compare the impact of using straws versus drinking directly from a cup:
| Aspect | Drinking with a Straw | Drinking Directly |
|---|---|---|
| Teeth Exposure | Minimal contact with front teeth | Full contact with all teeth |
| Staining Risk | Reduced | Higher |
| Enamel Protection | Better protection from acidic drinks | More exposure to acids |
| Convenience | Requires carrying straws | No additional tools needed |
While using straws is an excellent preventive measure, it’s important to note that it doesn’t completely eliminate the risk of staining. It should be used in conjunction with other dental care practices for the best results.
Immediate rinsing after consuming staining foods
Immediate rinsing after consuming staining foods is a crucial preventive measure for maintaining a brighter smile. This simple habit can significantly reduce the likelihood of stains setting in and help preserve the natural whiteness of your teeth.
Here’s why immediate rinsing is so effective:
- Removes residue: Washes away food particles and pigments before they can adhere to teeth
- Neutralizes acids: Helps balance the pH in your mouth after consuming acidic foods
- Stimulates saliva production: Encourages natural cleaning and remineralization processes
- Prevents dry mouth: Reduces the risk of bacteria growth that can lead to staining and decay
To make the most of this preventive technique, follow these guidelines:
- Rinse thoroughly: Swish water vigorously around your mouth for at least 30 seconds
- Use lukewarm water: Helps to avoid sensitivity that cold water might cause
- Don’t brush immediately: Wait at least 30 minutes after eating acidic foods before brushing
- Consider sugar-free gum: Chewing gum can stimulate saliva production if water isn’t available
Let’s look at some common staining foods and their potential impact:
| Food/Drink | Staining Potential | Benefits of Immediate Rinsing |
|---|---|---|
| Coffee | High | Reduces pigment adhesion to teeth |
| Red Wine | High | Helps neutralize acidity |
| Berries | Medium | Removes colorful residue quickly |
| Tomato Sauce | Medium | Prevents acidic content from eroding enamel |
| Curry | High | Minimizes yellow staining |
While immediate rinsing is beneficial, it’s important to remember that it’s not a substitute for regular brushing and flossing. Instead, it should be viewed as an additional step in your oral care routine, especially when you’re unable to brush your teeth right away.
To incorporate this habit effectively:
- Keep a water bottle handy during meals
- Make it a routine to rinse after every meal or snack
- Educate family members about the importance of rinsing
- Be mindful of situations where rinsing might not be immediately possible and plan accordingly
By consistently practicing immediate rinsing after consuming staining foods, you’re taking a proactive approach to maintaining a brighter smile. This simple yet effective preventive measure, combined with other dental care practices, can help you achieve long-lasting results in your quest for a radiant smile.
As we’ve explored these preventive measures for long-lasting results, it’s clear that maintaining a brighter smile involves more than just regular brushing and flossing. By incorporating protective sealants, using straws for staining beverages, and practicing immediate rinsing after consuming staining foods, you’re setting yourself up for success in preserving your pearly whites. These habits, when combined with other dental care practices, form a comprehensive approach to oral health that can help you maintain a brighter smile at any age. In the next section, we’ll delve into the science behind teeth whitening, providing you with a deeper understanding of how these processes work to enhance your smile.
Understanding Teeth Whitening Science
How teeth whitening works
Teeth whitening is a popular cosmetic dental procedure that can significantly improve the appearance of your smile. To understand how this process works, we need to delve into the science behind it.
Teeth whitening primarily targets the enamel and dentin layers of your teeth. The enamel is the outermost layer, while dentin lies beneath it. Over time, various factors can cause discoloration of these layers, leading to a dull or yellowed appearance.
The whitening process involves the use of oxidizing agents that penetrate the enamel and dentin. These agents break down the chromogens, which are the compounds responsible for tooth discoloration. As the chromogens break down, they become less visible, resulting in a brighter, whiter appearance.
There are two main types of teeth whitening:
- Intrinsic whitening: This targets stains within the tooth structure.
- Extrinsic whitening: This focuses on removing surface stains.
Here’s a breakdown of how different whitening methods work:
| Whitening Method | How It Works | Effectiveness |
|---|---|---|
| In-office professional whitening | Uses high-concentration whitening gels activated by light or heat | Fastest and most effective |
| At-home professional whitening | Uses custom-fitted trays with professional-grade gel | Effective, gradual results |
| Over-the-counter whitening strips | Contain lower concentrations of whitening agents | Moderately effective for mild stains |
| Whitening toothpaste | Uses mild abrasives and low concentrations of peroxide | Least effective, best for maintenance |
It’s important to note that the effectiveness of teeth whitening can vary depending on the type and severity of discoloration, as well as individual factors such as age and oral health.
Active ingredients in whitening products
The success of teeth whitening largely depends on the active ingredients used in the products. Understanding these components can help you make informed decisions about which whitening method might be best for you.
The two primary active ingredients found in most teeth whitening products are:
- Hydrogen Peroxide
- Carbamide Peroxide
Let’s examine each of these in detail:
Hydrogen Peroxide
Hydrogen peroxide is the most common active ingredient in teeth whitening products. It’s a powerful oxidizing agent that breaks down into water and oxygen when it comes into contact with your teeth. This chemical reaction helps to break down the bonds between stain molecules, effectively bleaching the teeth.
Key points about hydrogen peroxide:
- Concentration ranges from 3% to 38% depending on the product
- Higher concentrations are typically used in professional treatments
- Acts quickly but may cause more sensitivity
Carbamide Peroxide
Carbamide peroxide is another popular whitening agent. It breaks down into hydrogen peroxide and urea when it comes into contact with water. This means it’s essentially a slower-releasing form of hydrogen peroxide.
Key points about carbamide peroxide:
- Typically used in at-home whitening products
- Concentration ranges from 10% to 44%
- 10% carbamide peroxide is equivalent to about 3.5% hydrogen peroxide
- Acts more slowly but may cause less sensitivity
In addition to these primary ingredients, whitening products may contain:
- Sodium hydroxide or potassium hydroxide: To adjust pH levels
- Fluoride: To help strengthen enamel
- Glycerin: To improve consistency and prevent dehydration
- Carbopol: A thickening agent to help the gel adhere to teeth
It’s crucial to understand that the effectiveness and safety of these ingredients depend largely on their concentration and application method. Professional treatments supervised by a dentist can use higher concentrations safely, while over-the-counter products contain lower concentrations to minimize risks when used at home.
Addressing sensitivity during whitening
While teeth whitening can dramatically improve your smile, it’s not uncommon to experience some level of tooth sensitivity during or after the process. Understanding why this happens and how to manage it can help you achieve your desired results more comfortably.
Why sensitivity occurs
Tooth sensitivity during whitening typically occurs due to:
- Dehydration of the teeth: Whitening agents can temporarily dehydrate the teeth, making them more porous and sensitive.
- Exposure of dentin: If the whitening agent penetrates too deeply, it can reach the dentin layer, which contains nerve endings.
- Gum irritation: High concentrations of whitening agents can irritate the gums if not applied correctly.
Managing sensitivity
Here are several strategies to address and minimize sensitivity during the whitening process:
- Use desensitizing toothpaste: Start using a desensitizing toothpaste a few weeks before whitening and continue during the process.
- Adjust whitening frequency: If using at-home treatments, reduce the frequency or duration of applications.
- Take breaks: Implement “whitening holidays” between treatments to allow your teeth to recover.
- Apply fluoride: Use a fluoride gel or rinse to help strengthen enamel and reduce sensitivity.
- Avoid temperature extremes: Stay away from very hot or cold foods and beverages during and immediately after whitening.
- Choose lower concentrations: If sensitivity persists, consider using products with lower concentrations of active ingredients.
- Consult your dentist: They may recommend professional treatments or products specifically designed to combat sensitivity.
Professional solutions for sensitivity
Dentists have several tools at their disposal to help manage sensitivity during professional whitening treatments:
- Potassium nitrate: This compound helps to block pain signals from the nerve endings in your teeth.
- Amorphous calcium phosphate (ACP): This can help remineralize tooth enamel, reducing sensitivity.
- LED light therapy: Some studies suggest that certain light therapies may help reduce sensitivity during whitening.
| Sensitivity Management Method | How It Works | Best For |
|---|---|---|
| Desensitizing toothpaste | Contains compounds that block pain signals | Daily use before and during whitening |
| Fluoride treatments | Strengthens enamel and reduces porosity | Professional application or at-home use |
| Potassium nitrate gel | Blocks nerve signals in teeth | Professional application |
| ACP treatments | Remineralizes enamel | Professional application |
| LED light therapy | May reduce sensitivity (research ongoing) | Professional treatments |
Now that we’ve explored the science behind teeth whitening, including how it works, the active ingredients involved, and ways to manage sensitivity, you’re better equipped to make informed decisions about your teeth whitening journey. Remember, while over-the-counter products can be effective, consulting with a dental professional can ensure you choose the most suitable and safe whitening method for your individual needs. In the next section, we’ll delve into the various cosmetic dentistry options available for those seeking more comprehensive smile transformations.
Cosmetic Dentistry Options
Crowns and bridges for severely stained teeth
When conventional teeth whitening methods fall short, cosmetic dentistry offers advanced solutions for severely stained teeth. Crowns and bridges are two popular options that can dramatically transform your smile, providing both aesthetic and functional benefits.
Dental crowns are custom-made caps that cover the entire visible portion of a tooth. They’re an excellent choice for teeth that are deeply stained, misshapen, or weakened due to decay or injury. Here’s why crowns are a game-changer for severe staining:
- Complete coverage: Crowns encase the entire tooth, effectively masking even the most stubborn discoloration.
- Durability: Made from materials like porcelain or ceramic, crowns can last 10-15 years with proper care.
- Customization: Crowns are tailored to match the color, shape, and size of your natural teeth for a seamless look.
- Functionality: Besides improving appearance, crowns also protect and strengthen damaged teeth.
Dental bridges, on the other hand, are used to replace one or more missing teeth. They consist of artificial teeth (pontics) anchored by crowns on the adjacent natural teeth. Bridges can indirectly contribute to a brighter smile by:
- Filling gaps that may make surrounding teeth appear darker
- Preventing remaining teeth from shifting, which can lead to uneven wear and discoloration
- Improving overall oral health, making it easier to maintain a clean and bright smile
Here’s a comparison of crowns and bridges for addressing severely stained teeth:
| Feature | Crowns | Bridges |
|---|---|---|
| Purpose | Cover individual stained or damaged teeth | Replace missing teeth and improve overall smile appearance |
| Procedure | Single tooth treatment | Involves multiple teeth |
| Stain coverage | Direct | Indirect |
| Longevity | 10-15 years | 10-15 years |
| Maintenance | Regular brushing and flossing | Special flossing techniques required |
| Impact on natural teeth | Minimal alteration of existing tooth | Adjacent teeth may need to be prepared for crowns |
When considering crowns or bridges for severely stained teeth, consult with a cosmetic dentist to determine the best option for your specific needs.
Tooth-colored fillings for a uniform smile
Gone are the days when dental fillings meant noticeable silver or gold patches in your mouth. Today, tooth-colored fillings offer a discreet and aesthetically pleasing alternative that contributes to a uniform, brighter smile.
Tooth-colored fillings, also known as composite fillings, are made from a mixture of plastic and fine glass particles. They offer several advantages over traditional metal fillings:
- Natural appearance: These fillings are color-matched to your existing teeth, making them virtually invisible.
- Preservation of tooth structure: Less tooth material needs to be removed compared to metal fillings.
- Bonding strength: Composite fillings bond directly to the tooth, providing additional support.
- Versatility: They can be used for both front and back teeth.
- Mercury-free: Unlike amalgam fillings, composite fillings contain no mercury.
For those seeking a brighter smile, tooth-colored fillings play a crucial role in several ways:
- Replacing old metal fillings: Swapping out dark metal fillings for tooth-colored ones can instantly brighten your smile.
- Repairing chipped or worn teeth: Composite material can be used to restore the shape and color of damaged teeth.
- Closing small gaps: Minor spacing issues can be addressed with bonding techniques using the same composite material.
It’s important to note that while tooth-colored fillings are stain-resistant, they don’t whiten like natural teeth. If you’re planning on whitening your teeth, it’s best to do so before getting composite fillings to ensure a consistent color match.
Here’s a breakdown of tooth-colored fillings compared to traditional metal fillings:
| Feature | Tooth-colored Fillings | Metal Fillings |
|---|---|---|
| Appearance | Natural, matches tooth color | Noticeable silver or gold |
| Material | Composite resin | Amalgam or gold |
| Durability | 5-7 years on average | 10-15 years on average |
| Temperature sensitivity | Less sensitive to temperature changes | Can expand/contract with temperature |
| Tooth preservation | Requires less tooth removal | Requires more tooth removal |
| Cost | Generally higher | Usually lower |
| Suitability for visible areas | Excellent | Less desirable |
When opting for tooth-colored fillings, maintain good oral hygiene and avoid staining substances to keep your smile bright and uniform.
Gum contouring for a balanced smile appearance
While much attention is given to teeth when it comes to achieving a brighter smile, the appearance of your gums plays a crucial role in your overall smile aesthetics. Gum contouring, also known as gum reshaping or tissue sculpting, is a cosmetic dental procedure that can significantly enhance the balance and harmony of your smile.
Gum contouring addresses two main concerns:
- Gummy smile: When excessive gum tissue is visible when smiling
- Uneven gum line: When the gum line is irregular across the teeth
Here’s how gum contouring contributes to a brighter, more balanced smile:
- Improves tooth-to-gum ratio: By removing excess gum tissue, more of your teeth become visible, creating the illusion of longer, brighter teeth.
- Creates symmetry: Evening out the gum line across all teeth leads to a more uniform and attractive smile.
- Enhances teeth whitening results: With a properly contoured gum line, teeth whitening treatments can appear more effective and natural.
- Boosts confidence: A balanced gum-to-tooth ratio can significantly improve your smile’s overall appearance, leading to increased self-esteem.
The gum contouring procedure typically involves the following steps:
- Consultation and planning: Your dentist will examine your gums and discuss your desired outcome.
- Local anesthesia: The area is numbed to ensure comfort during the procedure.
- Tissue removal or reshaping: Using laser technology or traditional surgical tools, the dentist carefully removes or reshapes excess gum tissue.
- Sealing: The gum line is sealed to promote healing and prevent infection.
- Recovery: Most patients experience minimal discomfort and can return to normal activities within a day or two.
It’s worth noting that gum contouring is often combined with other cosmetic dental procedures for comprehensive smile makeovers. Here’s a comparison of gum contouring with other cosmetic dentistry options:
| Procedure | Purpose | Duration | Recovery Time | Long-term Results |
|---|---|---|---|---|
| Gum Contouring | Reshape gum line | 1-2 hours | 1-2 days | Permanent |
| Teeth Whitening | Brighten tooth color | 1-2 hours | Immediate | Temporary (1-3 years) |
| Veneers | Cover tooth imperfections | 2-3 visits | 1-2 weeks | 10-15 years |
| Bonding | Repair minor tooth damage | 30-60 minutes | Immediate | 3-10 years |
When considering gum contouring, keep in mind:
- Results are generally permanent, as gum tissue doesn’t grow back
- The procedure may be purely cosmetic or part of periodontal treatment
- Not everyone is a suitable candidate; a thorough evaluation is necessary
- Maintaining good oral hygiene is crucial for long-lasting results
By addressing gum aesthetics alongside teeth whitening and other cosmetic procedures, you can achieve a truly comprehensive smile transformation. A balanced gum line sets the stage for your bright, white teeth to shine, creating a harmonious and attractive smile that boosts your confidence at any age.
Now that we’ve explored various cosmetic dentistry options for achieving a brighter smile, let’s move on to discuss the importance of choosing the right oral care products for your specific needs.
Oral Care Products for Specific Needs
Whitening products for sensitive teeth
For those with sensitive teeth, achieving a brighter smile can be challenging. Fortunately, there are specially formulated whitening products designed to minimize discomfort while still delivering effective results. These products typically contain lower concentrations of whitening agents and incorporate desensitizing ingredients to protect your teeth.
Here are some of the best whitening options for sensitive teeth:
- Desensitizing toothpastes with whitening properties
- Low-concentration hydrogen peroxide strips
- LED light devices with gentle whitening gels
- Whitening pens with potassium nitrate
- Custom-fitted trays with sensitivity-friendly whitening gels
| Product Type | Key Benefits | Active Ingredients |
|---|---|---|
| Desensitizing toothpaste | Daily use, gradual whitening | Potassium nitrate, fluoride |
| Low-concentration strips | Convenient, targeted application | 6-10% hydrogen peroxide |
| LED light devices | Professional-like results, controlled application | Carbamide peroxide, LED light |
| Whitening pens | Precise application, on-the-go use | Hydrogen peroxide, potassium nitrate |
| Custom-fitted trays | Even application, personalized fit | Carbamide peroxide, fluoride |
When using these products, it’s essential to follow the instructions carefully and not exceed the recommended usage. Overuse can lead to increased sensitivity and potential enamel damage. If you experience persistent discomfort, consult your dentist for personalized recommendations.
Natural and organic oral care options
As more people become conscious of the ingredients in their personal care products, natural and organic oral care options have gained popularity. These products offer an alternative to traditional whitening methods, often utilizing plant-based ingredients and avoiding harsh chemicals.
Some popular natural whitening ingredients include:
- Activated charcoal
- Coconut oil
- Baking soda
- Turmeric
- Essential oils (e.g., peppermint, tea tree)
Natural whitening methods often work more gradually than chemical-based products but can be gentler on teeth and gums. Here’s a comparison of some natural whitening techniques:
| Method | How It Works | Pros | Cons |
|---|---|---|---|
| Oil pulling | Swishing oil to remove bacteria and stains | Improves overall oral health | Time-consuming, may not work for deep stains |
| Charcoal toothpaste | Absorbs surface stains | Quick results, natural abrasive | Can be messy, may be too abrasive for some |
| Baking soda paste | Gentle scrubbing action | Affordable, readily available | Can be abrasive if overused |
| Turmeric paste | Natural anti-inflammatory properties | Fights gum inflammation | Can stain clothing and surfaces |
| Herbal mouthwashes | Natural antibacterial properties | Freshens breath, supports gum health | May not have direct whitening effects |
When choosing natural and organic oral care products, look for certifications such as USDA Organic or EcoCert to ensure the authenticity of the ingredients. It’s also important to note that while these products are natural, they may still cause sensitivity or irritation in some individuals. Always perform a patch test before using a new product and discontinue use if you experience any adverse reactions.
Specialized products for denture wearers
Denture wearers have unique oral care needs, including maintaining the brightness of their artificial teeth. While dentures don’t stain as easily as natural teeth, they can still become discolored over time due to food, drinks, and tobacco use. Specialized products are available to help denture wearers keep their smiles bright and clean.
Key products for denture care include:
- Denture cleansers
- Denture brushes
- Denture whitening kits
- Denture adhesives with whitening properties
- Ultrasonic denture cleaners
Here’s a breakdown of these specialized products:
| Product | Purpose | Usage | Benefits |
|---|---|---|---|
| Denture cleansers | Remove stains and bacteria | Soak dentures overnight | Deep cleaning, kills 99.9% of odor-causing bacteria |
| Denture brushes | Mechanical cleaning | Brush dentures daily | Removes surface stains, food particles |
| Whitening kits | Restore denture color | Use as directed (varies by product) | Professional-grade whitening, safe for denture materials |
| Adhesives with whitening | Secure dentures and maintain color | Apply daily | Dual-action: keeps dentures in place and helps prevent staining |
| Ultrasonic cleaners | Deep cleaning and stain removal | Use weekly or as needed | Thorough cleaning, reaches crevices manual brushing may miss |
When using any of these products, it’s crucial to follow the manufacturer’s instructions carefully. Some important tips for denture care include:
- Remove and rinse dentures after eating
- Handle dentures carefully to avoid damage
- Clean your mouth after removing dentures
- Brush dentures at least daily
- Soak dentures overnight
- Rinse dentures before putting them back in your mouth
- Schedule regular dental checkups
It’s important to note that not all whitening products are safe for use on dentures. Avoid using regular toothpaste, household cleaners, or bleaching products, as these can damage the denture material or cause discoloration. If you’re unsure about a product’s safety for your dentures, consult your dentist for recommendations.
For those with partial dentures, it’s essential to maintain good oral hygiene for your natural teeth as well. Use a soft-bristled toothbrush and non-abrasive toothpaste to clean your remaining teeth, and floss daily to prevent decay and gum disease.
As we’ve explored the various oral care products for specific needs, it’s clear that there are solutions available for everyone, regardless of their unique dental situation. Whether you have sensitive teeth, prefer natural options, or wear dentures, maintaining a bright smile is achievable with the right products and care routine. In the next section, we’ll discuss strategies for maintaining your whitening results long-term, ensuring that your investment in a brighter smile lasts for years to come.
Maintaining Results Long-term
Touch-up treatments and their frequency
Maintaining a bright, white smile is an ongoing process that requires dedication and regular care. One of the key aspects of preserving your pearly whites is knowing when and how to perform touch-up treatments. These treatments help to counteract the gradual discoloration that can occur over time due to various factors such as diet, aging, and lifestyle habits.
The frequency of touch-up treatments depends on several factors:
- Initial whitening method
- Oral hygiene habits
- Diet and lifestyle
- Individual tooth characteristics
Let’s break down the recommended touch-up frequencies for different whitening methods:
| Whitening Method | Recommended Touch-up Frequency |
|---|---|
| Professional in-office whitening | Every 6-12 months |
| At-home custom tray whitening | Every 3-6 months |
| Over-the-counter whitening strips | Every 2-3 months |
| Whitening toothpaste | Daily use for maintenance |
It’s important to note that these are general guidelines, and your specific needs may vary. Consulting with your dentist can help you determine the most appropriate touch-up schedule for your unique situation.
When performing touch-up treatments, keep the following tips in mind:
- Follow the instructions carefully to avoid overuse or sensitivity
- Use a sensitivity-reducing toothpaste before and after treatments
- Avoid consuming staining foods and beverages for at least 24 hours after treatment
- Maintain good oral hygiene practices between touch-ups
By incorporating regular touch-up treatments into your oral care routine, you can ensure that your smile stays bright and vibrant for years to come.
Creating a personalized oral care routine
A personalized oral care routine is essential for maintaining the results of your teeth whitening efforts. This routine should be tailored to your specific needs, lifestyle, and dental health goals. Here are the key components to consider when creating your customized oral care plan:
- Brushing technique and frequency
- Brush at least twice daily, ideally after meals
- Use a soft-bristled toothbrush and gentle circular motions
- Spend at least two minutes brushing, covering all surfaces of your teeth
- Flossing and interdental cleaning
- Floss at least once daily to remove plaque and food particles
- Consider using interdental brushes or water flossers for hard-to-reach areas
- Mouthwash selection
- Choose an alcohol-free, whitening mouthwash to complement your routine
- Use mouthwash after brushing and flossing for optimal results
- Toothpaste choice
- Select a whitening toothpaste with gentle abrasives and stain-fighting ingredients
- Alternate between whitening and sensitivity-reducing toothpastes if needed
- Diet modifications
- Limit consumption of staining foods and beverages
- Rinse your mouth with water after consuming potentially staining items
- Hydration
- Drink plenty of water throughout the day to help rinse away stains and bacteria
- Regular dental check-ups
- Schedule professional cleanings and exams every six months
To create an effective personalized routine, consider the following factors:
- Your current oral health status
- Any existing dental work or restorations
- Sensitivity levels
- Lifestyle habits (e.g., smoking, coffee consumption)
- Time availability for oral care
Here’s a sample personalized oral care routine:
- Morning:
- Brush teeth with whitening toothpaste (2 minutes)
- Floss or use interdental brushes
- Rinse with whitening mouthwash
- After lunch:
- Rinse mouth with water
- Use a whitening pen or strips (if recommended by your dentist)
- Evening:
- Brush teeth with sensitivity-reducing toothpaste (2 minutes)
- Floss or use a water flosser
- Rinse with fluoride mouthwash
- Weekly:
- Use a whitening treatment (e.g., custom trays or strips) as recommended by your dentist
Remember, consistency is key when it comes to maintaining your bright smile. Stick to your personalized routine, and you’ll see long-lasting results.
Balancing aesthetics and oral health
While achieving and maintaining a bright smile is a desirable goal, it’s crucial to strike a balance between aesthetics and overall oral health. Over-focusing on whiteness can sometimes lead to neglecting other important aspects of dental care. Here are some strategies to help you maintain this balance:
- Prioritize oral health fundamentals
- Focus on preventing cavities and gum disease
- Address any existing dental issues before pursuing extensive whitening treatments
- Maintain regular dental check-ups and cleanings
- Choose gentle whitening methods
- Opt for gradual whitening approaches that are less likely to cause sensitivity
- Avoid overuse of strong bleaching agents that can damage enamel
- Incorporate remineralizing treatments
- Use products containing fluoride or hydroxyapatite to strengthen enamel
- Consider professional fluoride treatments during dental visits
- Monitor sensitivity levels
- Pay attention to any increased tooth sensitivity during whitening treatments
- Take breaks from whitening if sensitivity becomes uncomfortable
- Focus on overall smile aesthetics
- Consider factors beyond just color, such as alignment and gum health
- Explore non-invasive cosmetic options like bonding or veneers for comprehensive smile improvement
- Maintain a balanced diet
- Consume foods rich in calcium and vitamins for strong teeth and gums
- Limit acidic foods and beverages that can erode enamel
- Address underlying health issues
- Treat conditions like dry mouth that can affect both oral health and tooth color
- Manage systemic health issues that may impact dental health
To help you visualize the balance between aesthetics and oral health, consider the following comparison:
| Aspect | Aesthetics-focused Approach | Balanced Approach |
|---|---|---|
| Whitening frequency | Frequent, aggressive treatments | Moderate, dentist-recommended schedule |
| Product selection | Strongest available whitening agents | Gentle, enamel-safe products |
| Oral care routine | Emphasis on whitening products | Comprehensive care including gum health |
| Diet | Strict avoidance of all staining foods | Moderation and rinsing after consumption |
| Professional care | Focus on cosmetic treatments | Regular check-ups and preventive care |
| Sensitivity management | Ignored or minimized | Actively addressed and monitored |
By adopting a balanced approach, you can achieve and maintain a beautiful smile without compromising your overall oral health. Remember that a truly healthy smile is one that not only looks good but also functions well and remains pain-free.
In conclusion, maintaining long-term results from teeth whitening requires a multifaceted approach. By incorporating regular touch-up treatments, creating a personalized oral care routine, and balancing aesthetics with oral health, you can enjoy a bright, healthy smile for years to come. As we move forward, it’s important to remember that consistency and patience are key in achieving lasting results. With these strategies in place, you’ll be well-equipped to maintain your radiant smile at any age.
A brighter smile is within reach for everyone, regardless of age. By implementing the proven tips discussed in this blog post, you can achieve and maintain a radiant smile that boosts your confidence and enhances your overall appearance. From daily dental care habits and diet modifications to professional treatments and natural remedies, there are numerous ways to whiten and protect your teeth.
Remember, consistency is key when it comes to oral health and maintaining a bright smile. Incorporate these tips into your daily routine, stay informed about the latest advancements in dental care, and don’t hesitate to consult with your dentist for personalized advice. With dedication and the right approach, you can enjoy a dazzling smile that lights up every room you enter, no matter your age or lifestyle.
“Jaw-Dropping Teething Troubles? 5 Easy Ways
Share this content:
[…] tips for healthy living: Follow 7 Proven Tips for Healthy simple steps to stay fit and maintain wellness at every stage of life with Proven Tips for […]